


Staking—the method by which holders of proof-of-stake digital tokens lock up the worth of a portion of their tokens to contribute to the administration of the blockchain and are rewarded with staking rewards—is an more and more widespread approach to put your crypto to work.
Avalanche is a quick, versatile, safe platform for growing blockchains and decentralized apps (dapps). It presents highly effective scalability, throughput, and transaction processing, all made attainable by the platform’s novel consensus mechanism and Subnet structure.
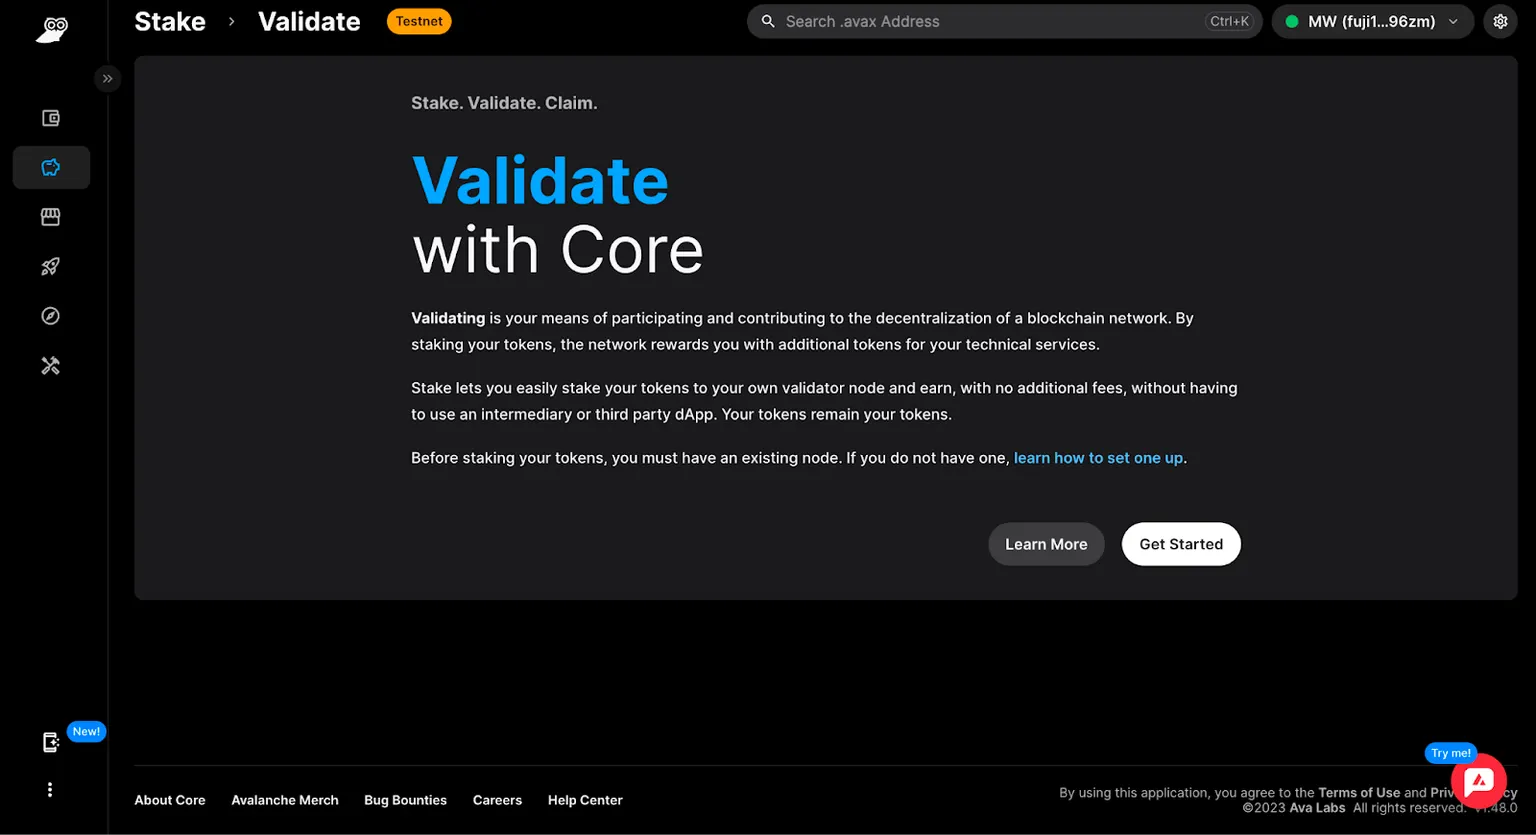
The go-to staking answer on the Avalanche platform is Core, a crypto pockets and portfolio dashboard to be used on Avalanche and different main chains like Bitcoin and Ethereum. Staking with Core simplifies the method for token holders/customers , removes intermediaries, and permits customers to customise the method primarily based on their very own wants.
Earlier than we get began with our in-depth information to staking on Avalanche utilizing Core, it’s useful to grasp the chains or Subnets on the Avalanche community.
Avalanche’s three major chains are the P-Chain, X-Chain, and C-Chain. The P-Chain manages validators and customized Subnets (customized blockchains constructed on Avalanche). The X-Chain is the default asset blockchain which permits for the creation and trade of belongings. And the C-Chain is an Ethereum Digital Machine-compatible chain which facilitates the creation of sensible contracts and dapps.
Under, we stroll you thru the straightforward steps you possibly can take to simply stake AVAX utilizing Core.
Step 1: Setting Up
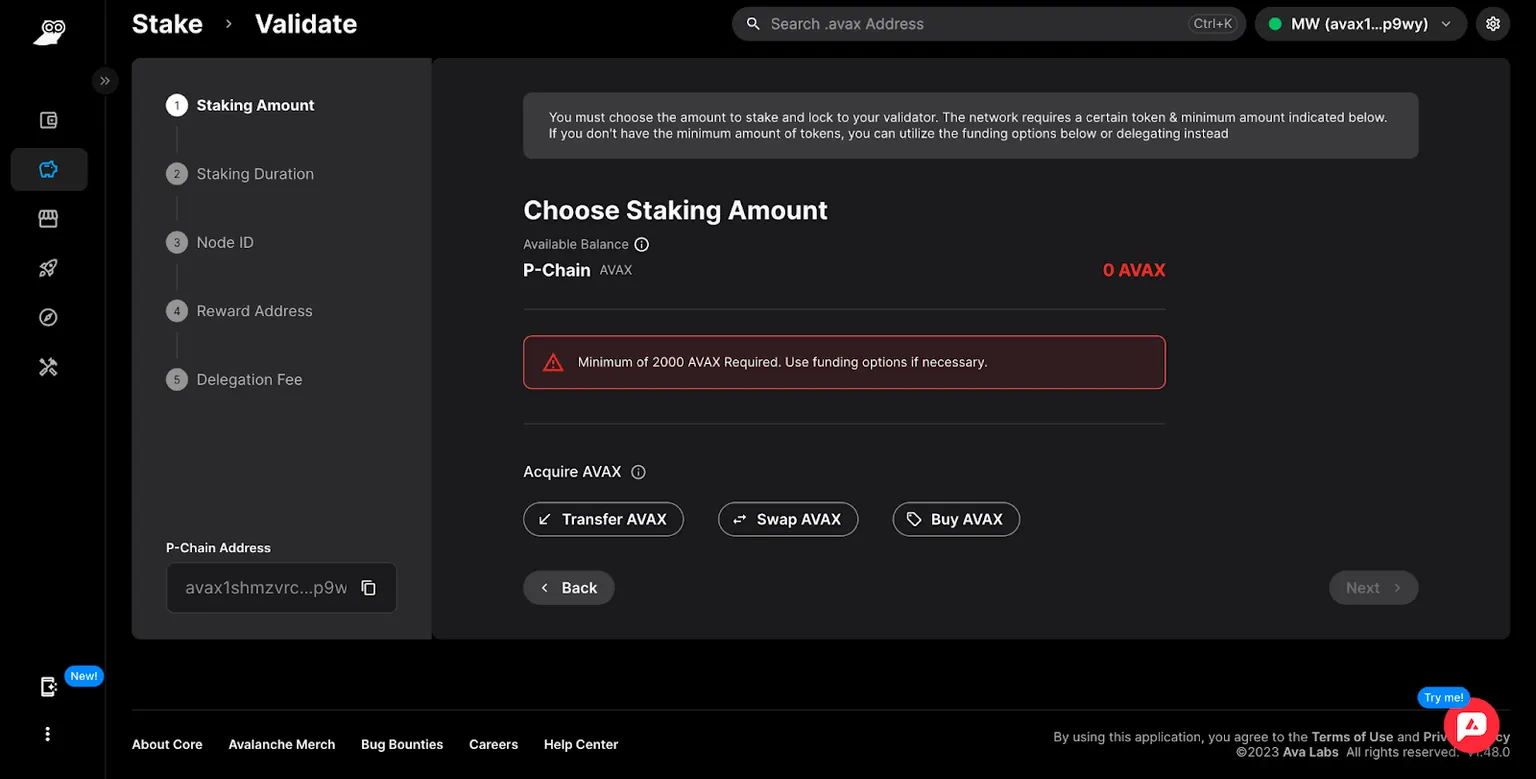
Earlier than staking with Core, customers should first set up the Core extension on their Google Chrome internet browser. For added safety, customers may join their Ledger {hardware} pockets. Start by downloading the free extension here then heading to core.app/stake. Customers also needs to make sure that they maintain the minimal mandatory amount of AVAX to take part within the staking course of. As of now, a person should maintain a minimum of 25 AVAX to delegate and a pair of,000 AVAX to validate.
Customers on the lookout for a easy approach to delegate on-the-go can obtain Core’s mobile app accessible on iOS and Android.
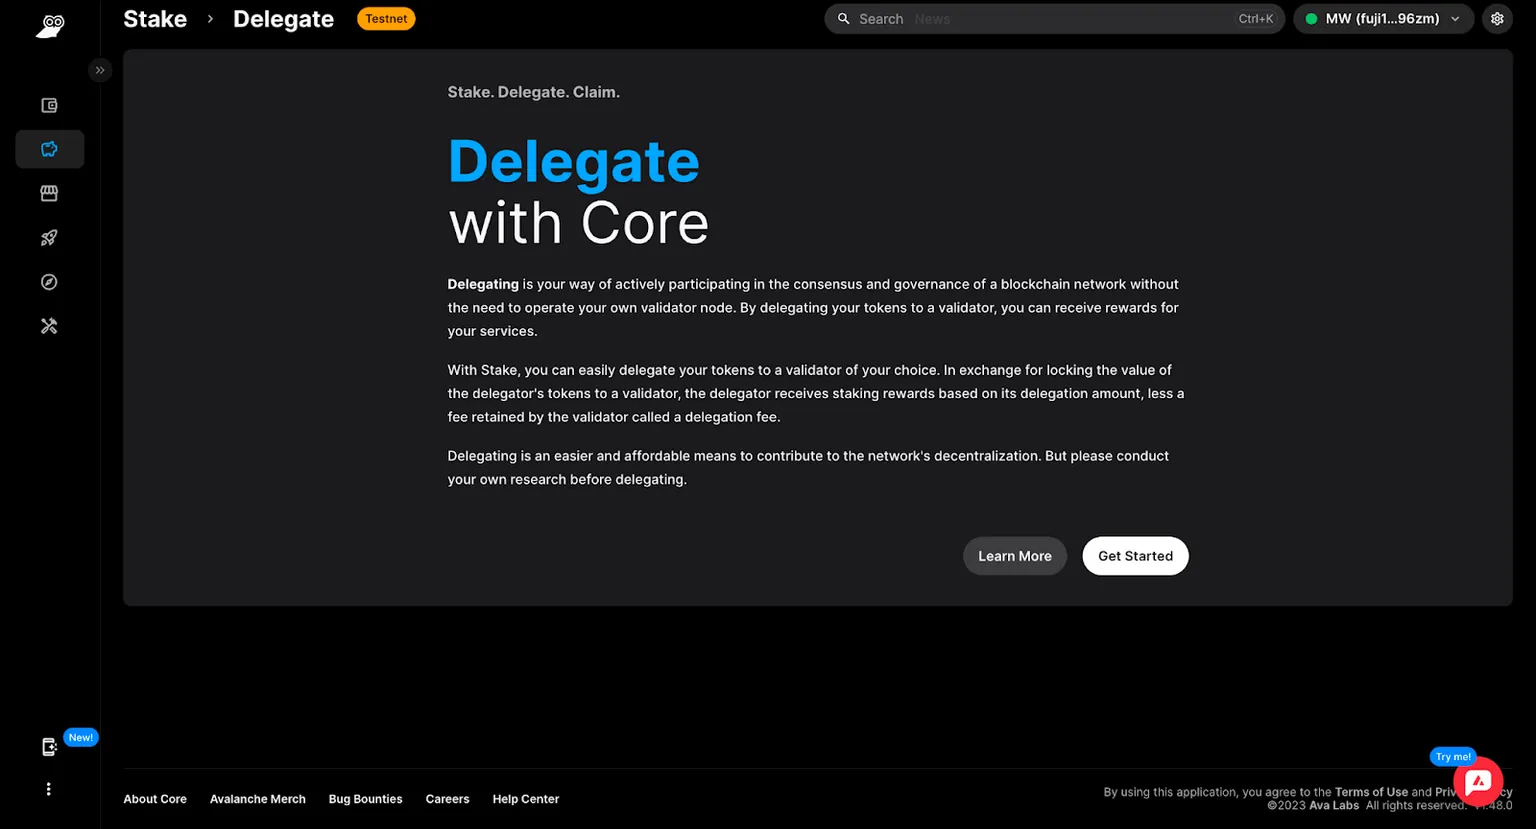
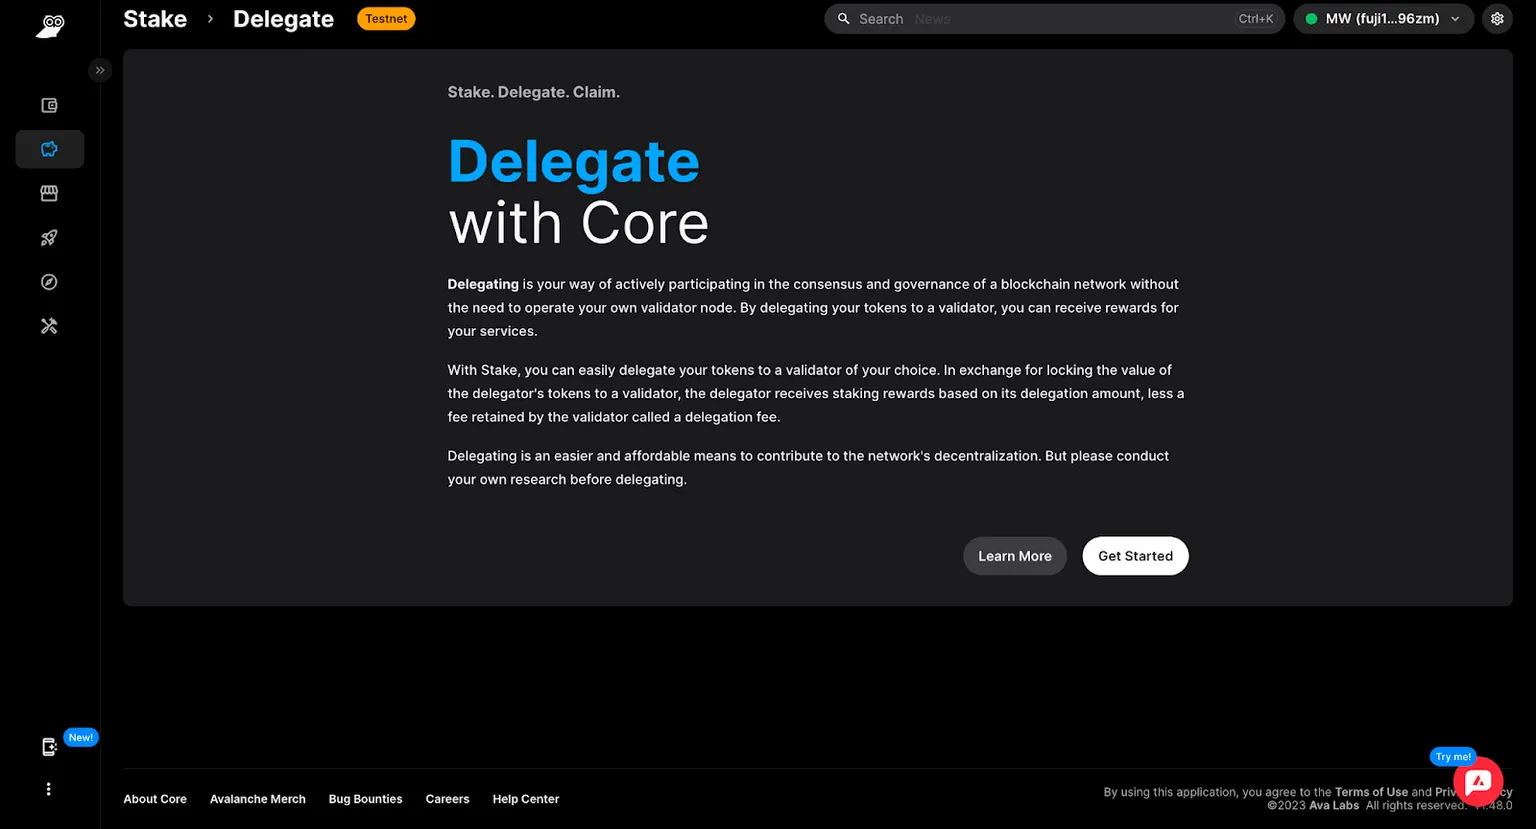
Step 2: Delegating
The method of delegating utilizing Core is simple and fast. With the Core extension linked to Core internet, navigate to Stake after which to the Delegate panel. At this level, you will notice a immediate to “Be taught Extra,” which hyperlinks to useful extra data offered by the Avalanche group. When prepared, click on on “Get Began” to proceed with delegating.
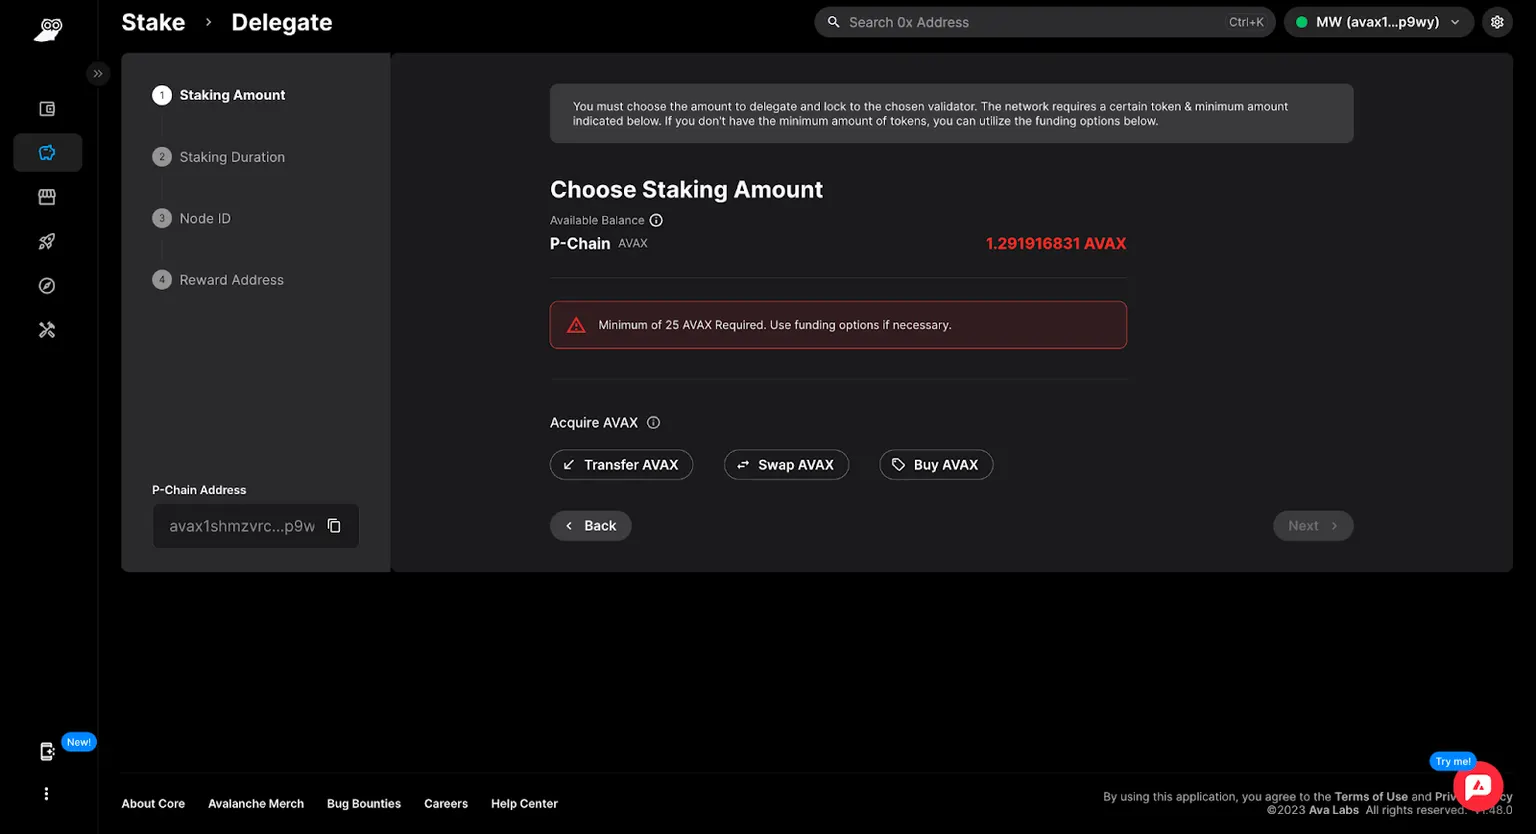
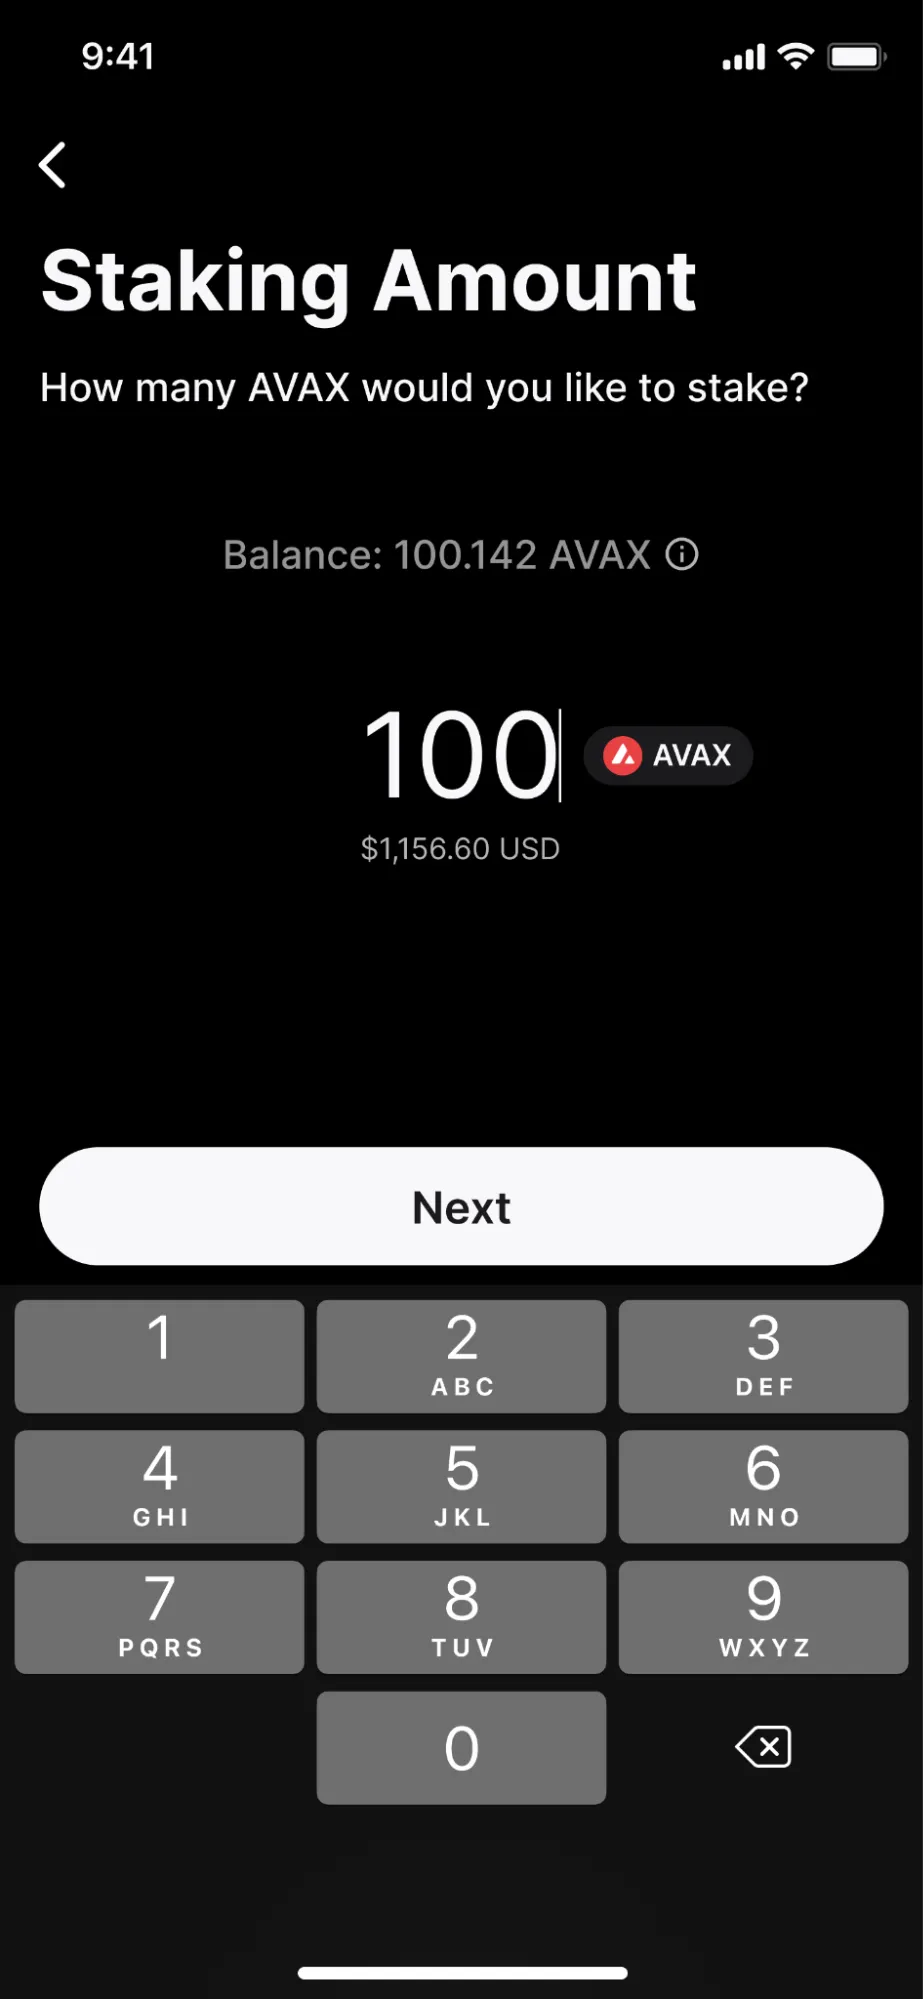
That is the place the Subnets listed above come into play. To ensure that a person to delegate, AVAX have to be current on the P-Chain (nonetheless, if the person doesn’t have AVAX on this chain, choices will probably be accessible to switch from different chains or buy them). Based mostly on the whole AVAX accessible, customers might then choose the amount of AVAX to delegate and click on “Subsequent.”
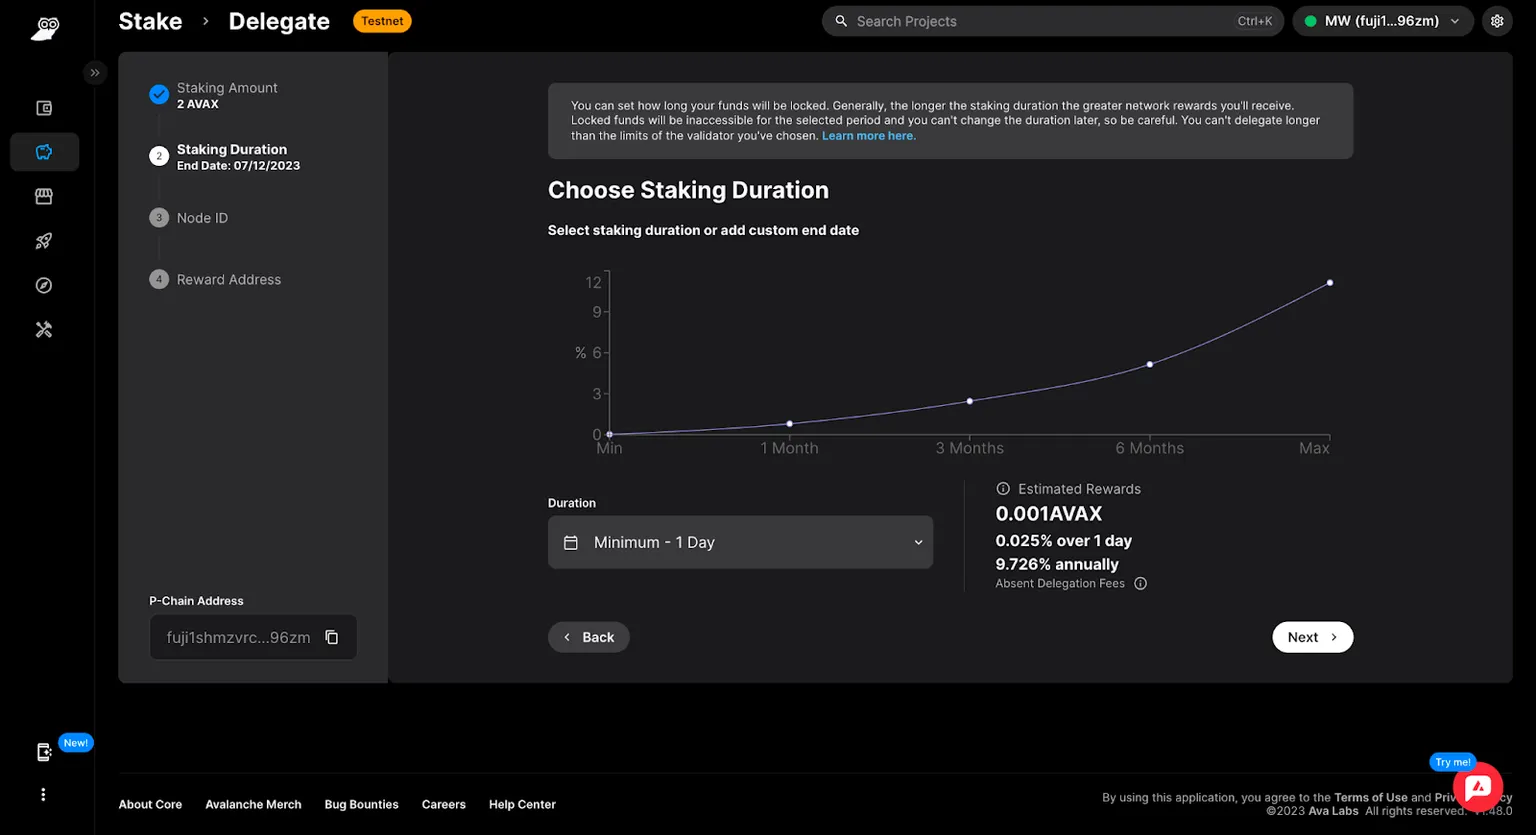
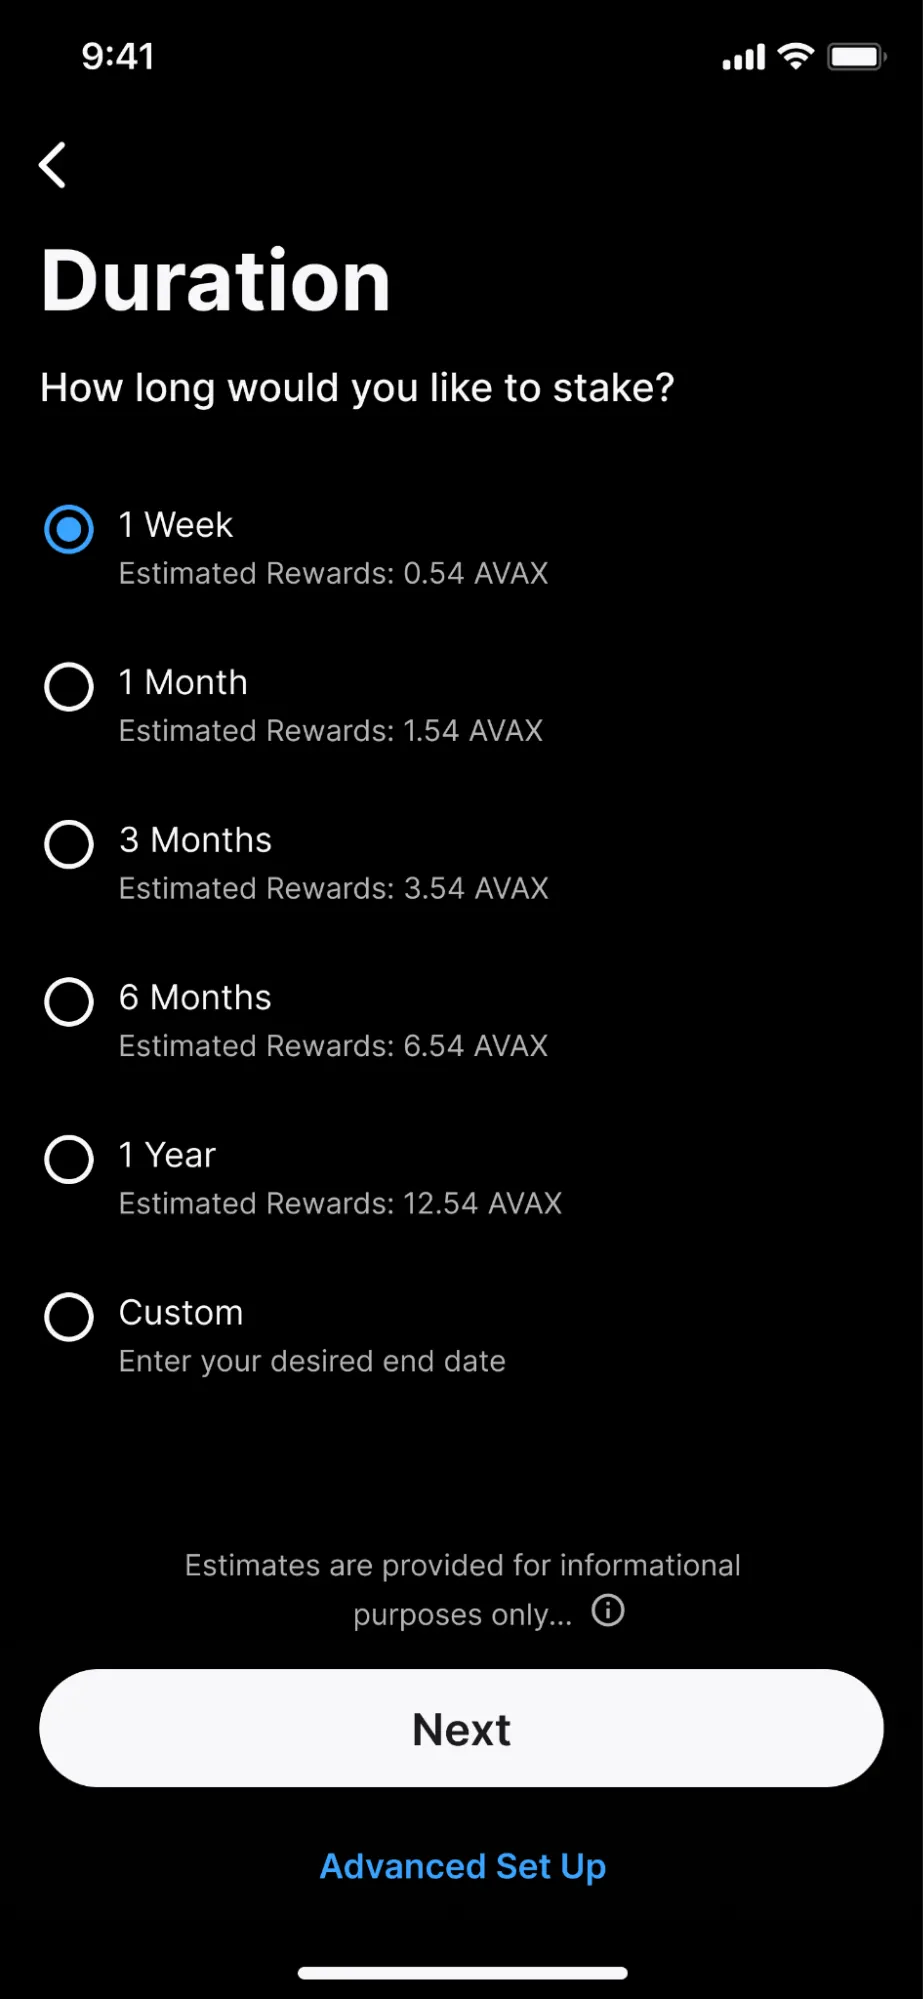
Core then offers AVAX holders with the choice to pick out a staking period. The system features a graph to symbolize the estimated staking reward for every period, for informational functions solely. Pre-defined durations vary from someday to 1 yr, and customers may specify their very own finish date.
Subsequent, customers might choose the node to which they need to delegate their AVAX. Observe that validators cost charges to these delegating AVAX, and these charges, represented as percentages, are listed within the menu of attainable nodes. Delegators might search for particular nodes or conduct a search throughout a number of parameters. Once you’ve chosen a node, click on “Choose” after which “Subsequent.”
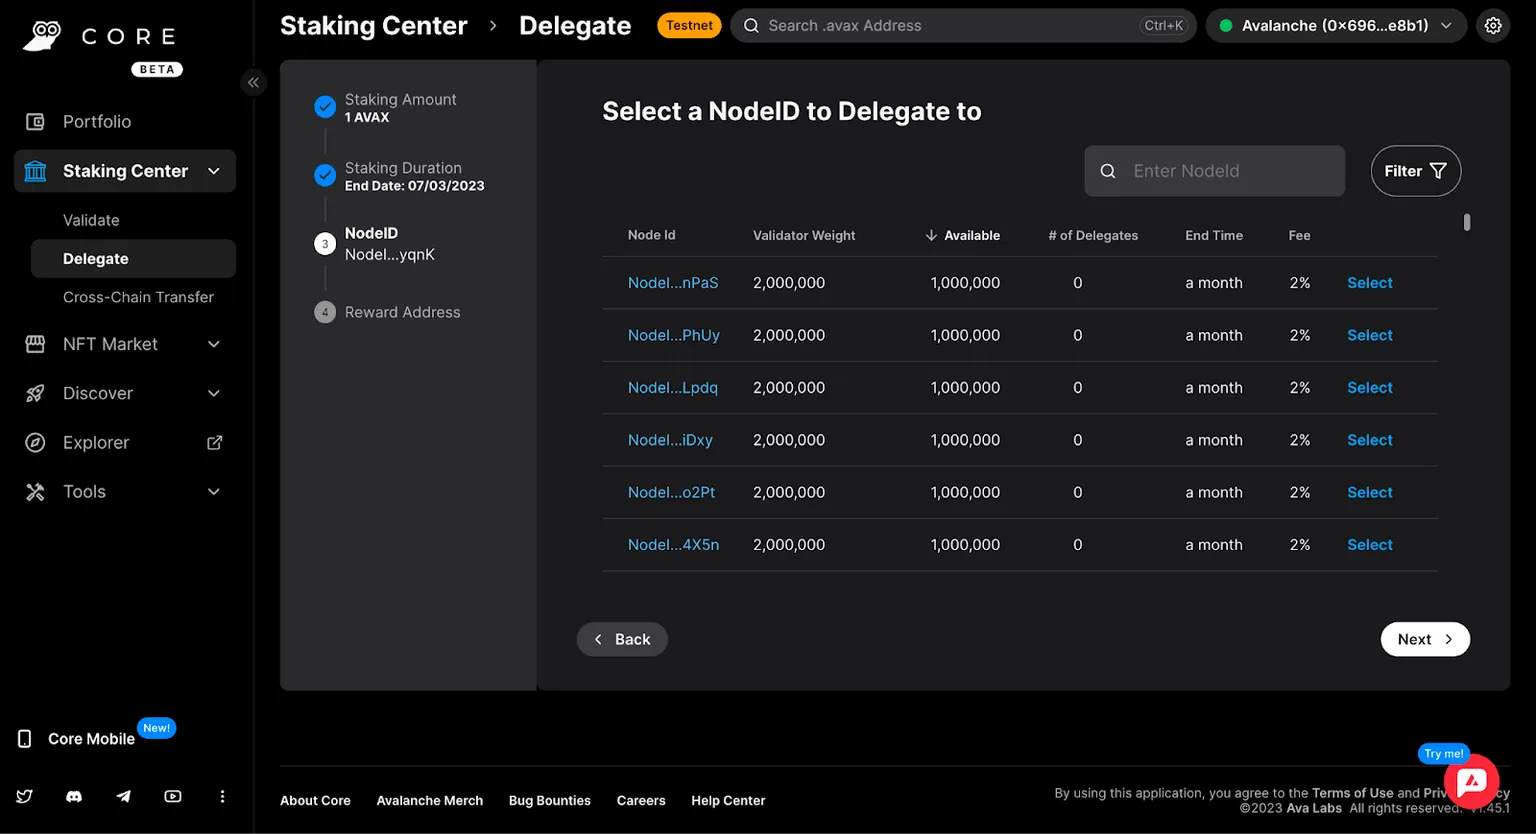
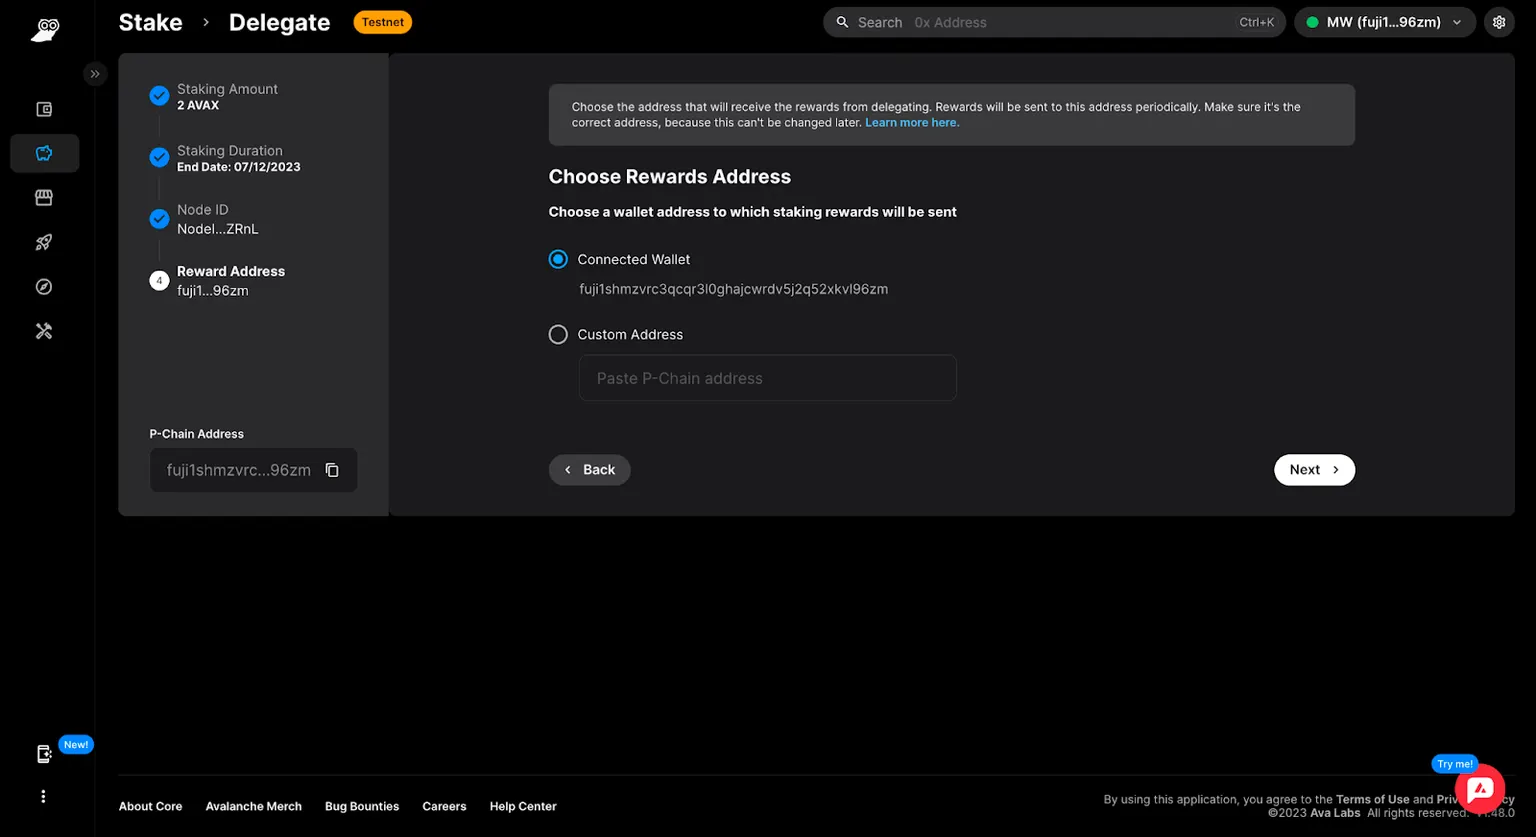
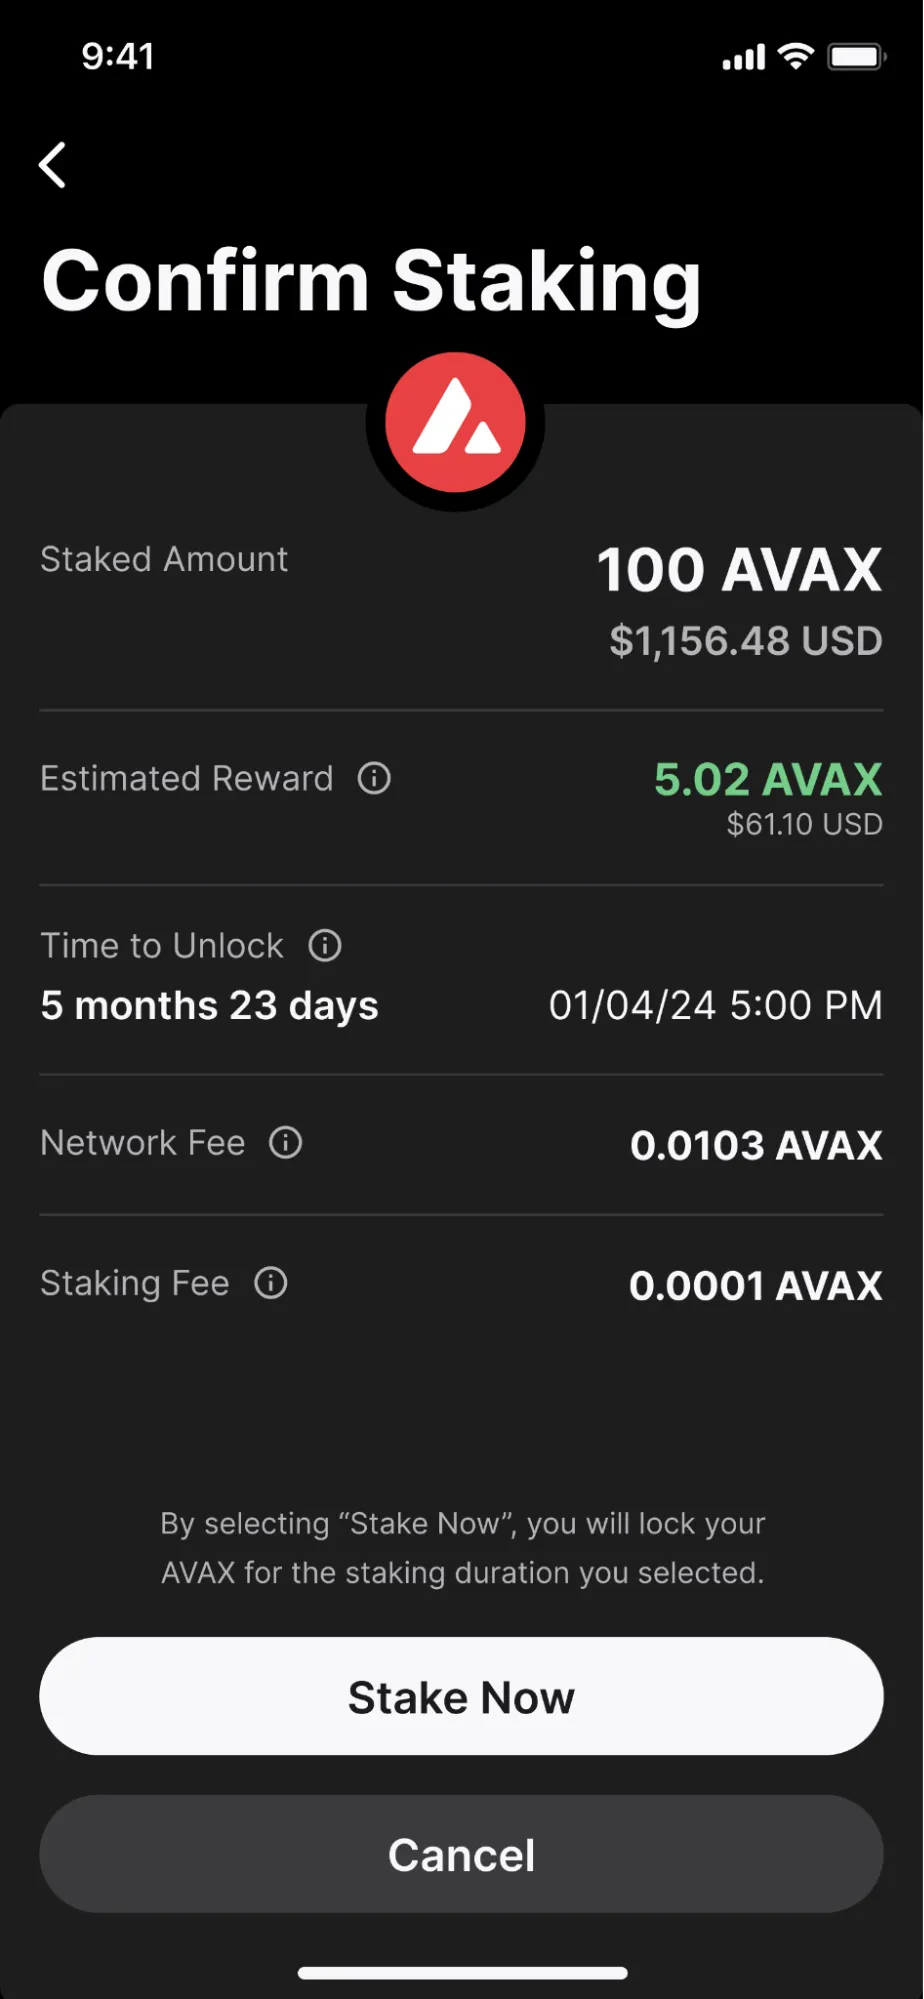
Lastly, enter a pockets handle for any staking rewards to be delivered to, view a abstract of the delegating course of and your choices, and click on “Submit Delegation” to finish the method.
After finishing, customers will probably be prompted to approve the transaction on Core extension and may then view details about the transaction on Subnet Explorer.

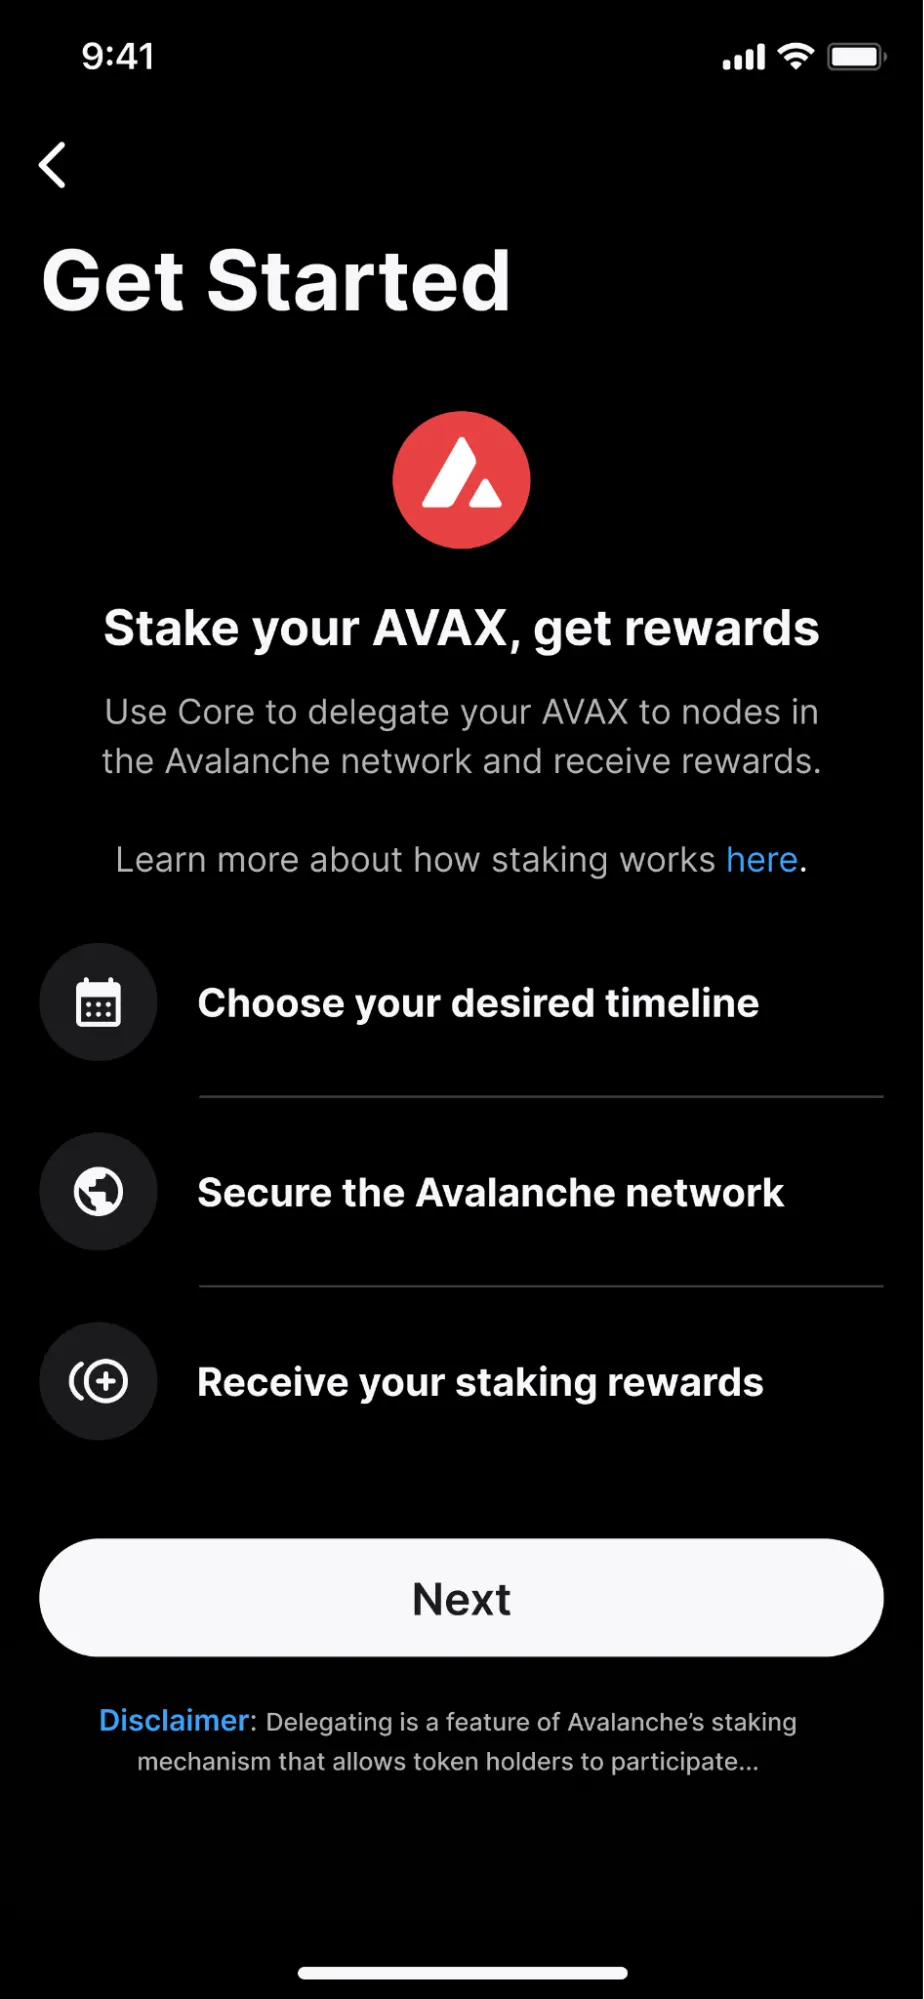
Staking AVAX on-the-go
Observe these steps to get began staking AVAX on-the-go:
- Adopted by inputting a sound quantity to delegate, choose “Subsequent.”
- Subsequent, set a staking period.
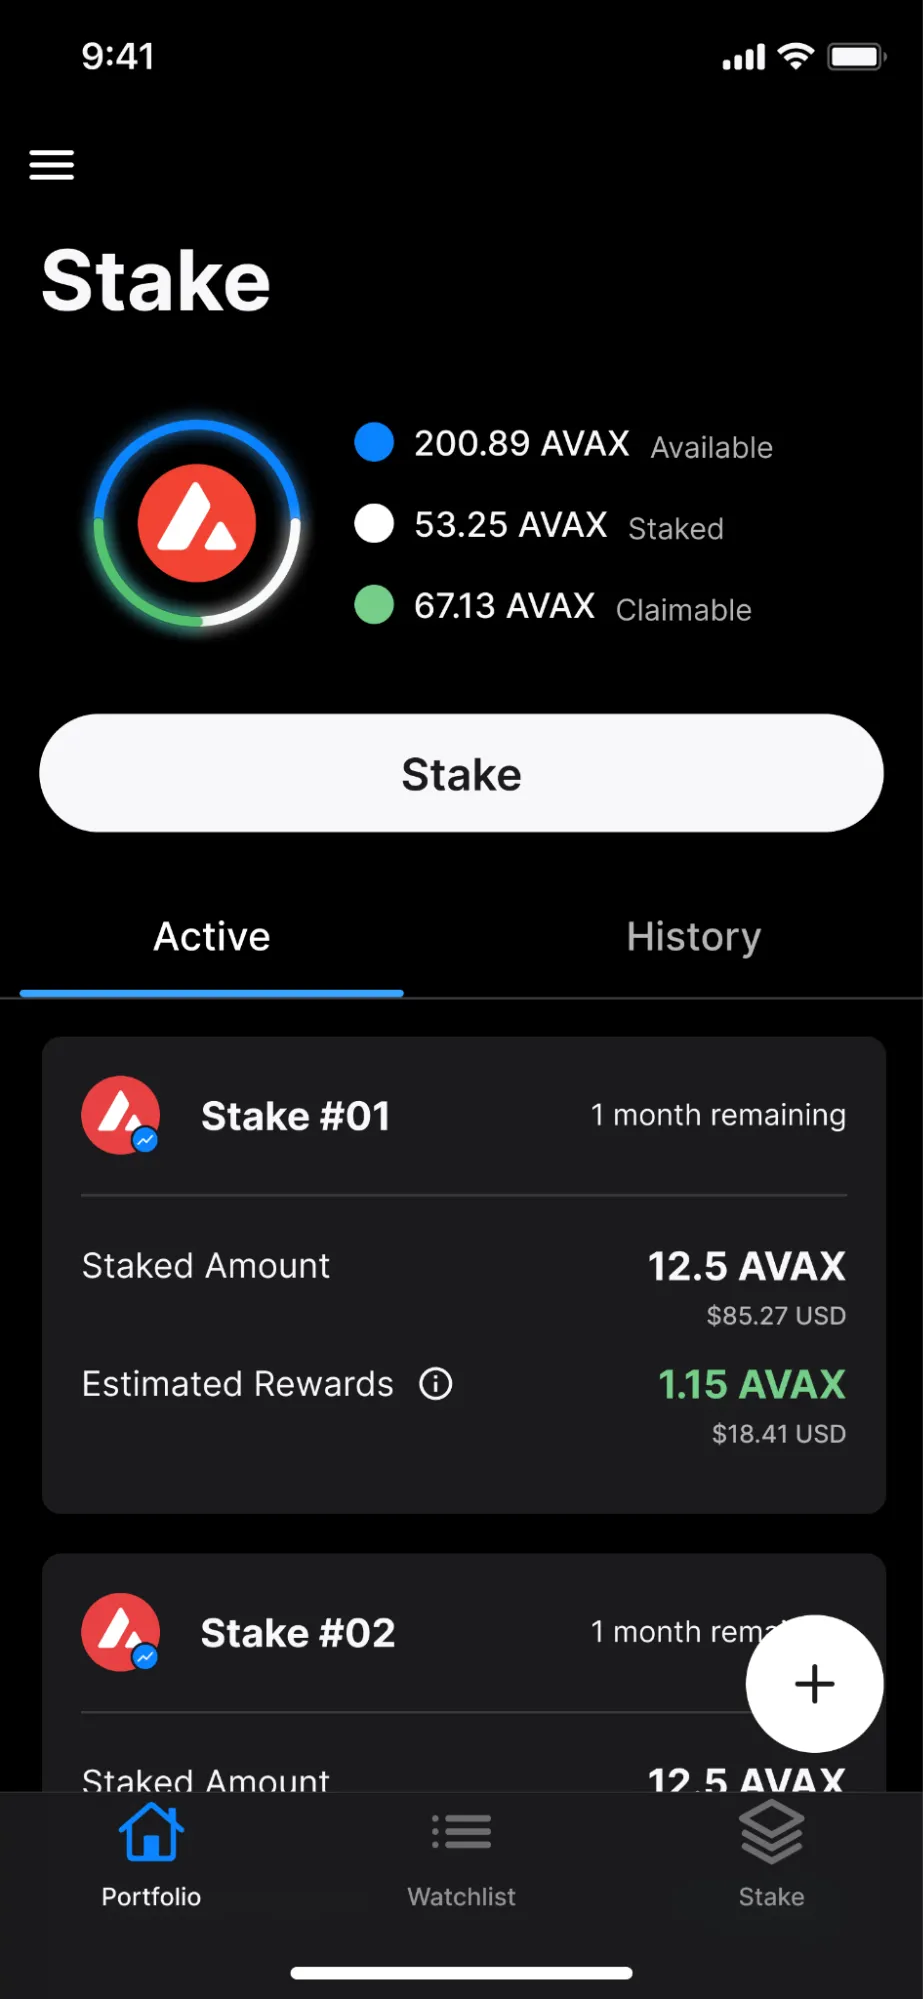
- Final, customers can entry a abstract of their staking data. Sustaining the pliability to revisit and modify any entered particulars, cancel the delegation setup, or finalize the delegation course of by deciding on the Stake Now button.
- Upon completion, customers will probably be notified of the profitable delegation. Overview the transaction particulars utilizing the Subnet Explorer or return to the Stake Dashboard for additional actions.
For a extra detailed information, check out this support article.
3.Validating
For AVAX holders trying so as to add stake to their validator, moreover establishing the Core extension as within the delegation course of, it is usually essential to have beforehand arrange a node. This may be executed manually or by using an install script offered by the Ava Labs improvement group.
With Core extension arrange and linked to Core internet and with a node already arrange, customers can merely navigate to the Stake system after which to the “Validate” panel. As with the delegation course of, customers will need to have AVAX on the P-Chain to be able to validate. Once more, transferring or buying tokens will probably be choices accessible to customers with out ample AVAX on the P-Chain to finish the validation course of.
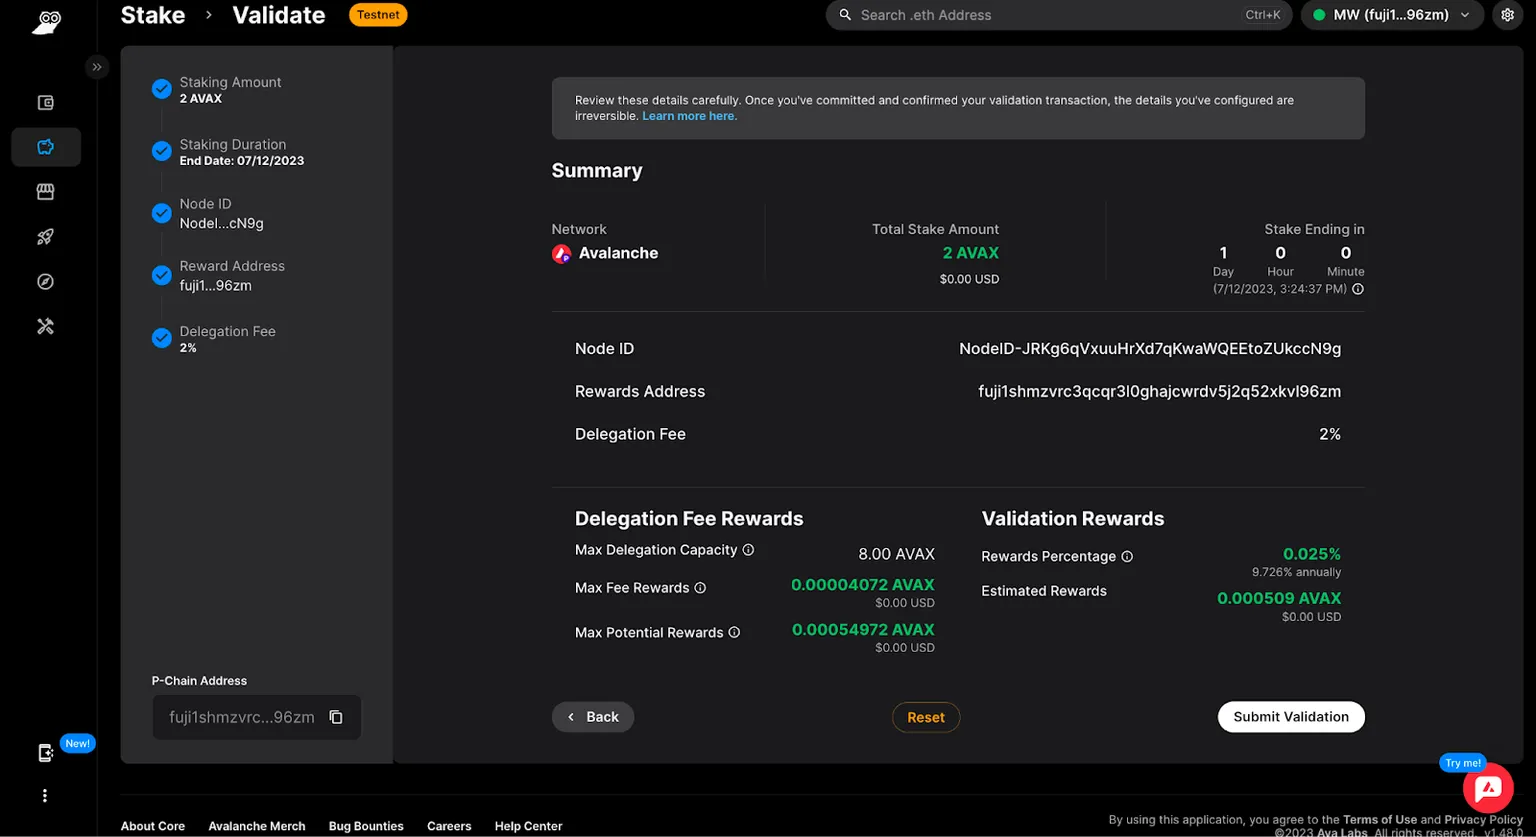
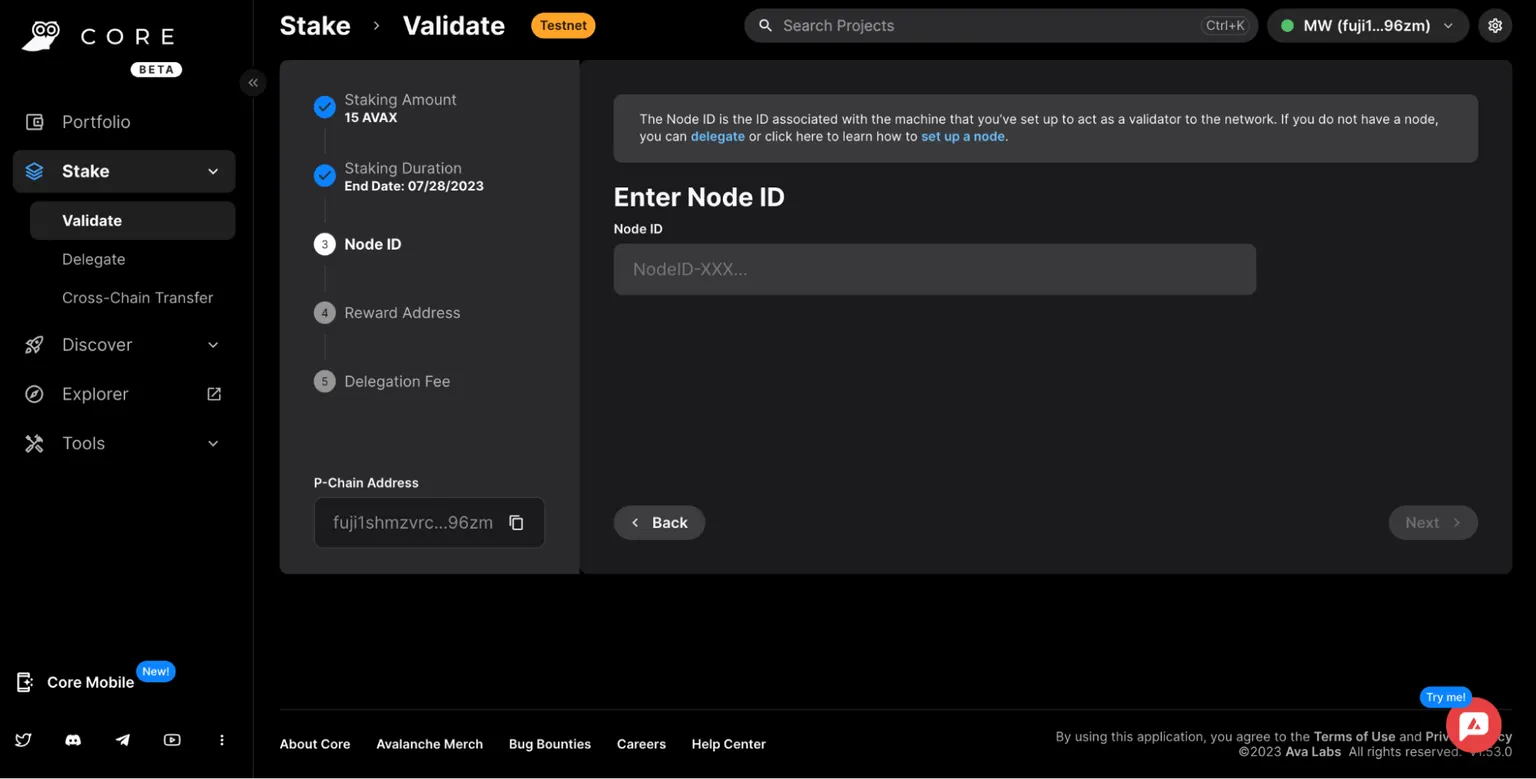
From this level on, the method to validate is analogous in some ways to the delegation course of. Customers specify an quantity of AVAX to validate, then select both a pre-set or a customized staking period.
Customers should then present a node ID to stake their AVAX to.
Lastly, customers affirm a pockets handle to obtain staking rewards.
One distinction for validators as in contrast with delegators is that the previous will be capable to choose a delegation payment in case any delegators contribute AVAX sooner or later. Customers should choose a payment between 2% and 100%.
To finish the validation course of, customers affirm particulars of the transaction, affirm the transaction itself on the Core extension, after which monitor the transaction data on the Subnet Explorer.
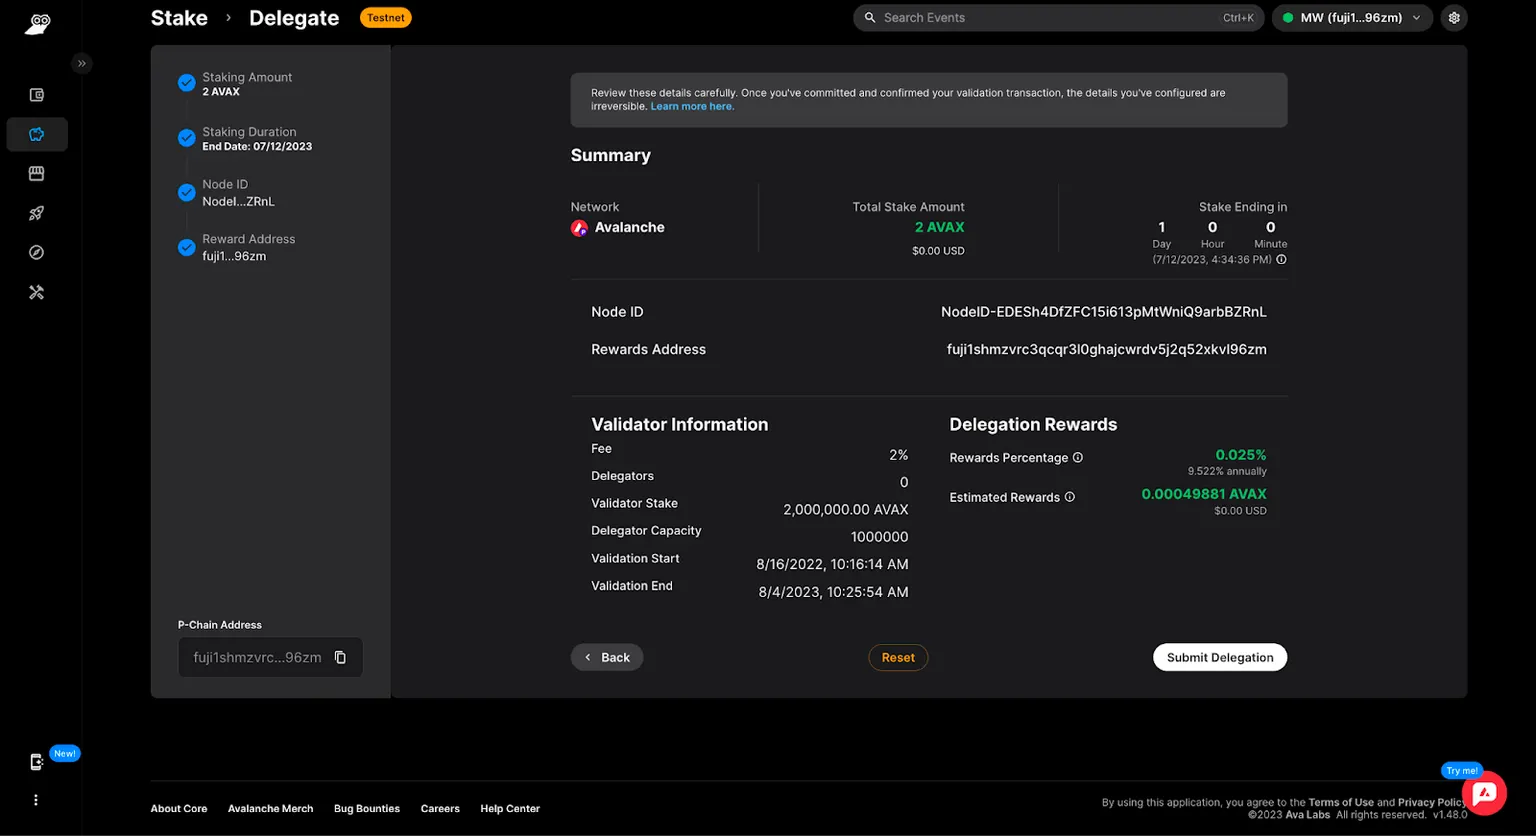
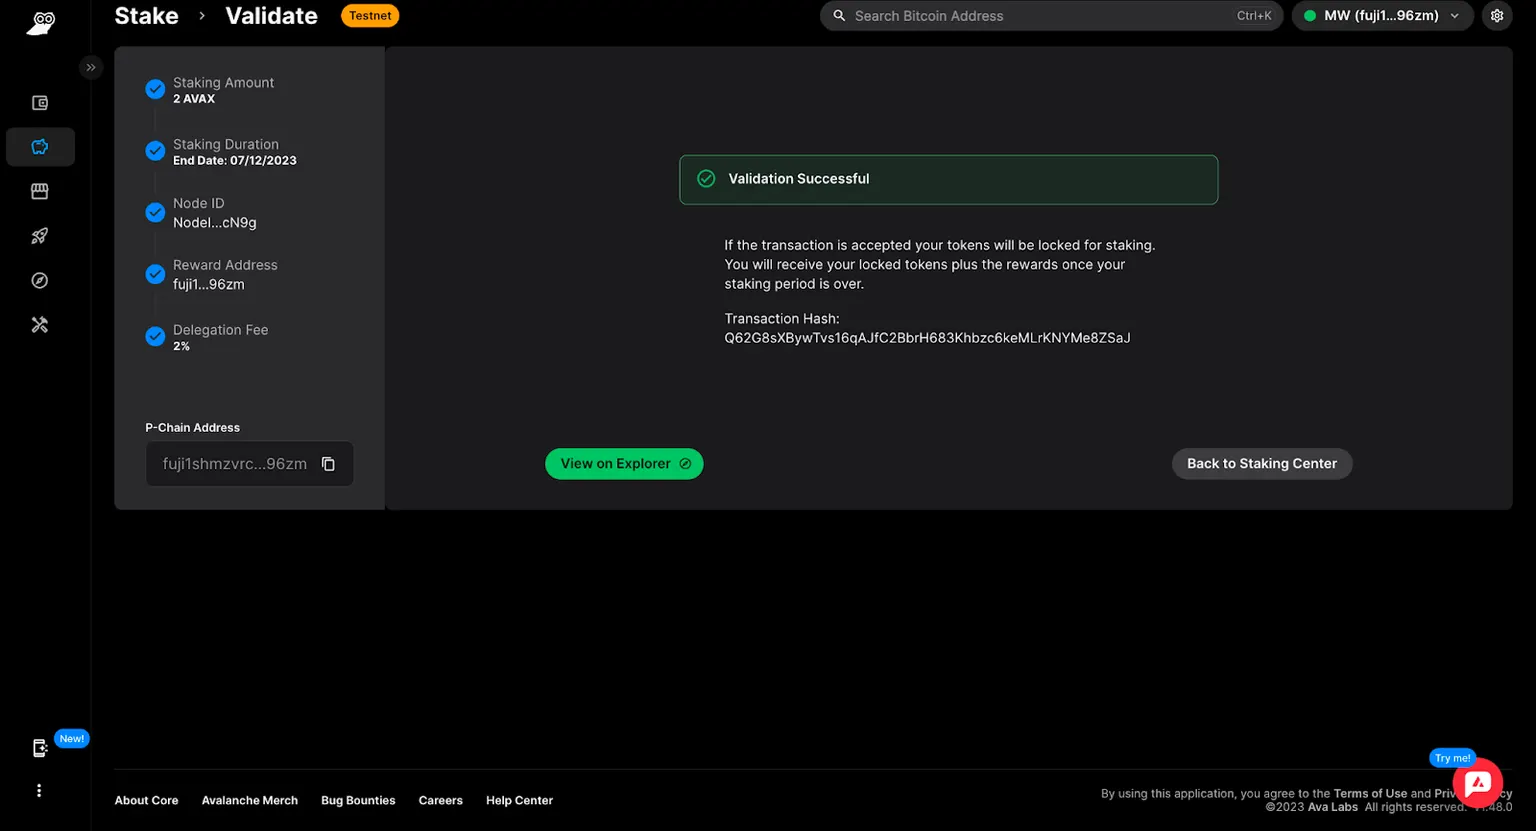
At this level, different customers will be capable to delegate to this node, and the validator will be capable to monitor details about delegator counts, delegator stakes, and related information.
For a extra detailed information, check out this support article.
4.Abstract
Because the go-to staking platform for Avalanche, Core offers a seamless and streamlined expertise that provides customizability with out the necessity for an middleman. It offers the chance for user-directed, self-custodial staking and delegating on to the protocol.
When you’re able to attempt Core’s Stake function, obtain the Core extension on the Chrome Web Store and head to core.app/stake.
For an on-the-go expertise, obtain Core pockets on the Apple App Store or Google Play Store.


where can i buy generic clomiphene what is clomid medication buy cheap clomiphene without dr prescription clomid contraindications generic clomid without dr prescription clomid tablets for sale cost of clomid without prescription
Greetings! Jolly productive advice within this article! It’s the little changes which will obtain the largest changes. Thanks a portion quest of sharing!
Good blog you possess here.. It’s intricate to on great calibre article like yours these days. I truly comprehend individuals like you! Rent vigilance!!
cheap azithromycin – buy ciplox medication flagyl 200mg brand
order semaglutide 14 mg sale – cheap cyproheptadine 4mg cyproheptadine 4 mg sale
buy generic domperidone for sale – buy sumycin generic buy flexeril without a prescription
propranolol over the counter – buy plavix 75mg buy methotrexate 10mg generic
amoxicillin us – ipratropium 100 mcg canada order ipratropium 100 mcg pill
order zithromax 500mg sale – zithromax 500mg sale order nebivolol online cheap
augmentin 375mg canada – https://atbioinfo.com/ buy ampicillin
esomeprazole drug – nexium to us buy esomeprazole without prescription
medex buy online – https://coumamide.com/ losartan cheap
order mobic 15mg online cheap – https://moboxsin.com/ order mobic 15mg generic
oral deltasone 5mg – corticosteroid cost prednisone 40mg
buy ed pills tablets – where to buy ed pills online free samples of ed pills
amoxil generic – combamoxi.com amoxil buy online
purchase diflucan for sale – https://gpdifluca.com/# buy cheap generic fluconazole
how to get cenforce without a prescription – fast cenforce rs purchase cenforce for sale
cialis vs tadalafil – https://ciltadgn.com/# pastillas cialis
cialis buy online canada – https://strongtadafl.com/ generic cialis available in canada
ranitidine 150mg oral – site order ranitidine 150mg online cheap
sildenafil oral jelly 100mg – https://strongvpls.com/ viagra ice cream to go on sale at selfridges
More delight pieces like this would urge the интернет better. clomid para que sirve culturismo
With thanks. Loads of erudition! https://buyfastonl.com/isotretinoin.html
I’ll certainly bring to review more. https://ursxdol.com/amoxicillin-antibiotic/
I’ll certainly carry back to review more. https://prohnrg.com/product/diltiazem-online/
With thanks. Loads of knowledge! achat stromectol en ligne
More posts like this would make the online time more useful. https://ondactone.com/simvastatin/
More posts like this would prosper the blogosphere more useful.
https://doxycyclinege.com/pro/esomeprazole/
I couldn’t turn down commenting. Well written! http://www.onlineunitconversion.com/link.php?url=https://www.facer.io/u/rybelsus
I couldn’t resist commenting. Adequately written! https://myvisualdatabase.com/forum/profile.php?id=117930
order dapagliflozin 10mg sale – site dapagliflozin order online
orlistat canada – https://asacostat.com/ brand xenical 120mg
The thoroughness in this piece is noteworthy. http://www.kiripo.com/forum/member.php?action=profile&uid=1193144